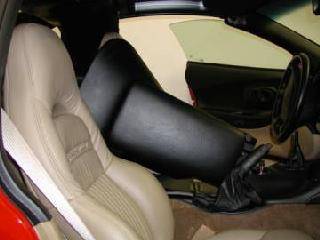
How to adjust the six speed shifter in your C5
Shifting my recently acquired 2003 coupe just did
not “feel right”. There was a vagueness to the shifts. Though it did actually
not grind the gears, there was also a feel of resistance and having to “hunt”
for the right slot for each gear position. Performing the adjustment described
below, solved the problem and gave a positive feel to the shifts.
A search of “corvettemechanic.com” (great website by
the way) revealed the method to adjust the shifter on a C5. Some more searching
provided a step by step of how to get to the adjustment bolts from
“corvetteforum.com”. The following, then, is a composite of the instructions
from the two websites, plus my own narrative and additional pictures to
complete the specific instructions on performing this adjustment:
Tools Required
- Small screwdriver
- Large screwdriver
- ViseGrips
- Small block of wood - about 1x3x2
- Torx T15 driver
- Torx T40 Bit
- 3/8" Ratchet, extension, 10mm socket, 3/8"
socket
- Torque wrench
- Plastic mallet
- Small length of dowel (suggest 3/8” dia. X 4” long)
- Optional - Flashlight, inspection mirror, magnet,
claw type pick up tool, strong language... (only needed if you manage to
drop anything in the tunnel – not that I did of course)
- Start by using a small screwdriver to pry the
appliqué from the shift knob.

- Next, use vise grips to lock onto the metal
"T" retainer.

3. Use the block of wood in conjunction with the large screwdriver to easily pry the retainer up and out. Unscrew and remove the shift knob.


- Open the console and carefully remove the two plastic
covers with a small screwdriver. Remove the two 10mm nuts.

- Gently pry out the center module housing the traction
control button. (As an optional recommended step, disconnect the negative
battery cable before proceeding.) Disconnect the connectors to the air bag
indicator light, traction control button and accessory power receptacle
and remove module. Then remove the two 10mm nuts that retain the rear and
front consoles to the floor tunnel.

- Next carefully remove the cover of the inside air
temp sensor beside the ignition switch. Remove the Torx screw.

- Locate and remove the two other Torx screws located
beside the cig lighter and behind the ashtray.


- Slide the rear portion of the console back and tilt
up to locate and disconnect the fuel door switch connector.

- Remove the console and set aside.
- Carefully remove the front/dash portion of the
console -- don’t forget to reach behind and disconnect the cig lighter
connector. This reveals the closeout boot covering the shifter. Remove the
four 10mm nuts that secure the boot and lift off the boot.

- Put the
shifter in neutral. Use the T 40 Torx bit, ratchet and extension to loosen
the two mounting bolts and the shifter rod clamp bolt.
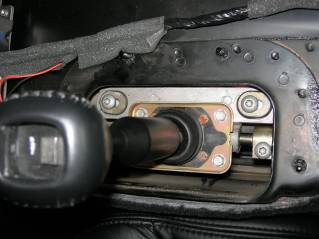
- With all three bolts loosened, slide the positioning
pin at the front of the shifter down into the hole at the front of the rod
housing. This may take some jiggling of the mechanism and use of the 3/8”
dowel to push down on the pin – don’t force it as it will slide into place
easily when you find the correct position. Do make certain that the pin is
fully seated down to the small cutout you’ll see at the front of the
shifter base. (If you don’t fully seat it the first time, use the vise
grips to pull the pin back up and start again.)
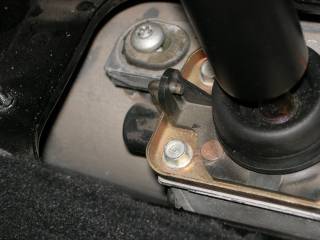
- Once pin is fully seated, torque all three Torx bolts
to 22 ft. lbs. IMPORTANT: Torque the two mounting bolts first and then the
clamp bolt. Withdraw the pin.
At this point you may want to
temporarily re-install the shifter knob only and road test. If you do suggest
you also reconnect the traction control switch to avoid setting any codes. I
simply rested the module on the center tunnel with appropriate padding.
Once satisfied with the
adjustment, reassemble in reverse order of the above instructions. Some
additional notes on reassembly: Do not over tighten any of the fasteners ---
you don’t want to crack any plastic components; use the dowel and plastic
mallet to tap the metal “T” retainer back into the shifter knob.